Tuesday, January 7, 2014

Washi tape

     I love washi tape.  It comes in lots of colors and patterns. It's affordable, and the best part is, you can find so many creative uses for it.  You typically see washi tape used on cards and packages, but there are also a lot of other interesting ways to use it.  I even created a whole pin board on Pinterest with fun things to do with washi tape. 

     I can see myself doing this project in the future for the long wall in my daughter's room.  They really need some art and this could be a fun project for us all to do, not to mention DIY on the cheap. 


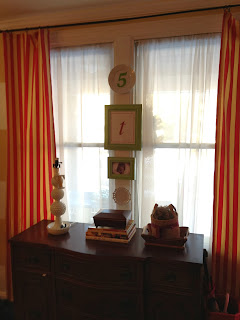
We all know how much I love monograms.  I'm thinking about this for my hallway when I make that over.  That's on the list for this year.
 
Here's the washi tape I used for my project below.


I also added some to the ends of my DIY book shelves.  I recommend using a little bit glue though to keep these in place.
 
What fun washi tape projects have you tried?


Monday, January 6, 2014

Pinterest

     Majority of my ideas come off of Pinterest.  It's one of my favorite sites along with a few others.  I love being able to pin something and be able to save it for later.  I also use it while I'm out shopping.  I will take a quick picture of something and then pin it.  This way instead of impulse buying, it gives me a chance to sit back and figure out if this is really something I love/want/need.  Feel free to find me and follow me here on Pinterest.

Happy pinning Y'all!!

Sunday, January 5, 2014

Mantel makeover

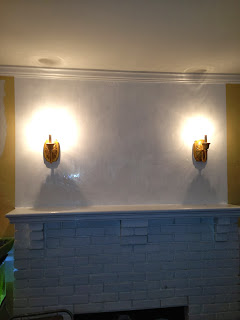
    In yesterdays post, I showed you my fireplace mantel inspiration.  I've only started the first step in achieving that look, which is where I painted a rather large white square above the mantel.  The actual molding and tiling will come at a later time. My husband can now take a deep sigh of relief.  He's currently in the  basement building me a cornice for a triple window for our master bedroom.   I'll have a post on that once it's completed. 

     For now, I couldn't leave the mantel bare.  In fact, I was feeling pretty energized last night and began to style it. 


Not looking very pretty, but it felt like a new space to decorate again.


Here's a break down of my mantel.  This tea caddy was purchased from the Bombay Company a few years ago.  I love using books to add height.

 
I love these sconces from Ballard Designs.  I had them in my last house as well.

 
This glass vase I purchased at the dollar store and used a vinyl letter from craft cuts to personalize it.  I  threw in some limes, and we're in business.

 
 Here's a full on view.  Eventually, my plan is to cover up all the brick.  I dream of a beautiful wood fireplace.  Above the mantel will have either molding or fretwork.


Here's my home goods find....I need to make a home goods run once a month.  The yellow vase is from Anthropologie.
 
I recently purchased this print from The Pink Pagoda.  I actually bought 2 of them and my intention was to put them on either side of my bed, but it just didn't look right.  The frame was originally black and from Target but I sprayed it gold.


Remember this Goodwill find?  I showed you in yesterdays post  about placing artwork in unexpected places.  The yellow frame never really grew on me.

 
A little rub n buff to the rescue.

 
Okay, so I ended up getting some rub n' buff on the actual painting.  I'm not going to lose sleep over it.  I did take this sunburst mirror I recently purchased from Wayfair.

 
I have a coffee table to go seal.  It never ends....
 

Saturday, January 4, 2014

Painting the weekend away

     This weekend so far, has been very productive.  My husband has been putting together Barbie's dream house, her camper, and a Sofia the first desk, all for the girls.  When he finished that, he got to work on a project for the master bedroom that I have been dying to do.  Well not me personally, I'm glad to let him do all the big stuff, I'm just happy to see it coming along. I'm hoping sometime tomorrow I'll have some progress shots to show you all.

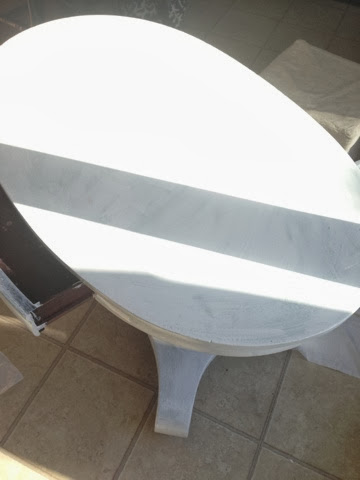
     As for the coffee table, it's received 4 coats of paint and I will need to seal it sometime this week.  That's one piece of furniture that gets a lot of use.  I still have it in the kitchen, I want to give the paint a chance to cure for a couple of days.

Here's what it looks like now.


I can't wait to get it back into the living room and come up with some ideas on how to style it.  I've been pinning Ironstone bowls off of Etsy.  I think it would make for a cute catch-all.
 
I love to layer and hang artwork and plates in unexpected places.  For example in the kitchen I have these plates above the window and the boxwood wreath.  The smaller plates are Ikea but I found them at Goodwill for 50 cents apiece.  The middle plate I spray painted white.  The vegetables on them were silver.  I wanted to give them a more unified look.  I also purchased the vinyl numbers from Craft cuts.  Here was my inspiration link and my photo down below of what I did.


Today, I played around with 2 paintings I already own.  I placed them in my living room window.  I'm not sure which one I'm going to go with.  Neither painting is really obstructing a view.  That window looks out into my neighbor's side yard and house.  This offers us both a little bit of privacy, while still bringing in some much needed light.


This one is the same painting from my last trip to the Goodwill.  I just gave the frame a quick spray in yellow but I just might change it up again. 

 
This is one of my favorite pieces of artwork in my home.  It's moved around in my house quite a bit.  Currently it is in my youngest daughter's room.  Her nursery is a bit shabby chic-becoming the catch all room at the moment.  I think this might be to large to hang in the window, so back to the nursery it goes.
 
In my front window, I have a collection of plates, typography and a framed baby picture.  I love how it all works and spray painting the frames the same color really helped unify them as well as make them pop.


Progress is being made in the dining room...I know, I know my New Year resolution is to finish up the girl's room, but I just had to get this done.  It really wasn't time consuming at all and took 2 coats of paint.  I had the paint out already from the coffee table project.  I have ordered a few pieces of artwork for the girl's room as well as a couple of things to hang in the living room.  More on that coming soon.


This is my inspiration picture for my fireplace makeover.
 
 
Like I said "progress".  Let's just hope my poor husband doesn't read this.  He's the hired labor in all of this, and molding scares him.
 

Friday, January 3, 2014

Snow White and paint

     I plan nothing, well that's not entirely true. I plan things all the time but never follow through with them. I like to shake things up a bit and live design wise, by the seat of my pants and mostly the dollars in my wallet. (Or lack there of). When I woke up this morning or more like when I went to bed last night, I was already pretty sure there would be no school. I really didn't know what or how much I would be able to get accomplished with the kiddos running around.  Which is okay unless you are chomping at the bit to get some serious house stuff underway.

Well inspiration struck me when I looked out and saw this. 


     That's my deck looking all snow covered. If you notice to the left its shoveled out, that would be the Husband's doing and where the grill is. We pretty much grill all year round. Seeing the bright whiteness of the snow reminded me of a project that I have had in my head for a long time now, but kept putting off in order to do other projects. 

Here's my coffee table.   I'm not sure what I was thinking when I painted it that awful pea green.  I'm still glad I took the risk.  If you don't try, you will never know.


     It's a coffee table now but it didn't start out as one. In fact it started out as a sofa table, as in behind the sofa. Okay, let me back up and give you the brief history of this table. I love Empire furniture, as well as Duncan Phyfe, and Eastlake. This piece was a mahogany stained sofa table. I purchased this off eBay around 13 years ago. The seller actually drove this piece down to my house from New York at no cost, because it was important to him that it was going to a good home. 

     My husband and I were renting a town house at that time but had just put an offer down on our first house. I knew it would work perfectly for the elongated living room that house had. And it did! It was the first piece of furniture we bought for that house. It's also a piece that I know I will have for the rest of my life. I've never grown tired of it and have never seen anything I've liked more, but when we moved to this current house, I was worried. The layout of this house was much different and using it as a sofa table just wasn't a viable option. Panic began to set in until I came up with the idea of having the legs cut down to coffee table height. 

     In came my Brother-in-law,  he tends to be our general contractor and guides my Husband through many projects.  He cut the legs down and I've held onto them for a just in case any future furniture arrangements will require it to be restored. 

    A couple of years ago I decided to change things up and painted the coffee table a bold green. I liked it for a while, but really started to give thought to painting it all white. I just didn't want the hassle of sanding, priming, painting, and sealing again. Well, the table through use (play area) for the kids has gotten a bit banged up. I actually don't mind, it adds to the life of a piece. 

     Looking out the window today, I became inspired enough to get the paint out (same paint as I use for all the trim), grabbed a paintbrush and moved the table into the kitchen. Lucky for me it's on antique casters. I cleaned it, and gave it a light sanding. So far, I've given it 1 coat of primer. 


Here's the top. 


The kids love to stash some rather interesting things inside this drawer. 


     The chunky legs I love so much.  I'm hoping I can wrap up this project by the end of the weekend. 

What are your plans for this weekend? 

Thursday, January 2, 2014

Indoor herb garden


     I've wanted an indoor herb garden for sometime now, but I am not the best at remembering to water my indoor plants or my out ones for that matter. I do enjoy cooking and I do enjoy using the freshest of ingredients. Kind of seems like a no brainer for me to start with indoor herbs before raising chickens. 

     Turning to Pinterest, I've found many pictures that have motivated me to not give up on my not very green thumb and incorporate my love for milk glass. It mostly gives me a good excuse to hit the thrift more often to add to my collection. 

     Here are pictures that I found via Pinterest that I fell for. 


How great does this all look? I especially love the topiary in the middle. I think this is a great place to tuck in a table. 


I love the use of ironstone here and especially placed on a mantle. It's done so elegantly. I'm filing this idea away for when I re-do my dining room. 


Milk glass and transfer ware, just doesn't get any better than this. At least for me ;-) Once I saw this picture, I just knew I was going to attempt this in my kitchen. 


     I grabbed 2 of my milk glass vases from my last thrift store visit. I picked up 2 herb plants from the grocery store, mint for its amazing scent and cilantro because most of my recipes require it. You can probably find them in your local grocery store, in the produce section.  I placed a few small stones at the bottom, removed the plastic bottom and placed them in. Easy right? 


     At first I placed them by the window and I still might but I kept thinking about that one picture of the indoor garden on the table. I have an antique east lake table I bought years ago at Brimfield. It needs some mending and a new paint job but I'm going to live with it for a little while until inspiration strikes me. 


Here's a close up of the legs on this table.


Wednesday, January 1, 2014

New post, new year!!

     Happy 1st day of 2014 everyone. I hope everyone has had a happy, and healthy Holiday Season. I, for one sure have. 
 
     This morning when I got out of bed, I made the decision to go for a run. I use to run 5-6 days a week but then got lazy and out of the habit. It wasn't a long one but it's a start and I know I'll get back to where I was previously. 

     I also headed to the grocery store, but before I left I made a meal plan that requires a lot of fresh fruits and vegetables. I will admit I did pick up some things to bake. One of my resolutions for this year is to bake more with my kids. It's something they always enjoy doing and I need to get over the mess that is made and realize that memories are also being made! It's also a lot of fun to surprise them with a yummy treat after school. 

     I accomplished one small thing today. Probably, the most important in my house. Snack organization. I have a general rule after school that my kids as well as those I watch after school, may have 2 snacks. 1 junk item and 1 healthy, this way it doesn't spoil their appetite before dinner.  Now, if I were to leave the junk food items in their original packaging the kids would be clever enough to claim the whole bag as their 1 junk item. I came up with a clever plan to foil this line of thinking though. ;-) You can find at your local grocery store small size containers with lids to individually package snacks. The ones I purchase are featured below and come in packs of 6 for $2.50. I also use these to organize all sorts of things around the house. 


These are great to grab and go as well. 

Leave a comment below and let me know how you organize your snacks?