Happy Monday everyone!! I hope you all had a great weekend. I know I sure did. My creative juices were flowing, and as such I managed to get a few projects started/finished, some on my list and others that suddenly inspired me to drop everything and do.
A few months ago, I bought 2 small footstools from Ikea. Super cheap at just $14.99 apiece. I picked out the off white canvas slipcover figuring I could just bleach away when needed. My initial plan for them was to flank them on each side of my bookcase, but when I got them set up, they came up, well kinda short, plus the off-white slipcovers didn't look right next to my very bright white bookcase. See my dilemma? I knew I would find a home for them eventually and recovering them would be a snap.
Here are a few pictures I found off Pinterest that really inspired me.


I headed to Jo-ann's and hit it big with 50% off all their fabric. I knew ahead of time that my 2 footstools would not be paired together, so I chose 2 separate fabrics. Both were on sale for $5.99 a yard and I bought 2 yards of each fabric. For $24 bucks, plus just a few extra dollars for a little bit of trim, I managed to customize these footstools to my own liking.
What I used to cover the footstools was my staple gun and my hot glue gun. You will also need a pair of fabric scissors to trim to size. If you didn't want to permanently attach your fabric you could easily substitute the glue for velcro strips. I used 2 yards for each with some fabric left over, (for future sofa pillows), and 2 yards of trim for each, with very little left over. You can omit the trim, but I chose to include it, as I just liked the look.
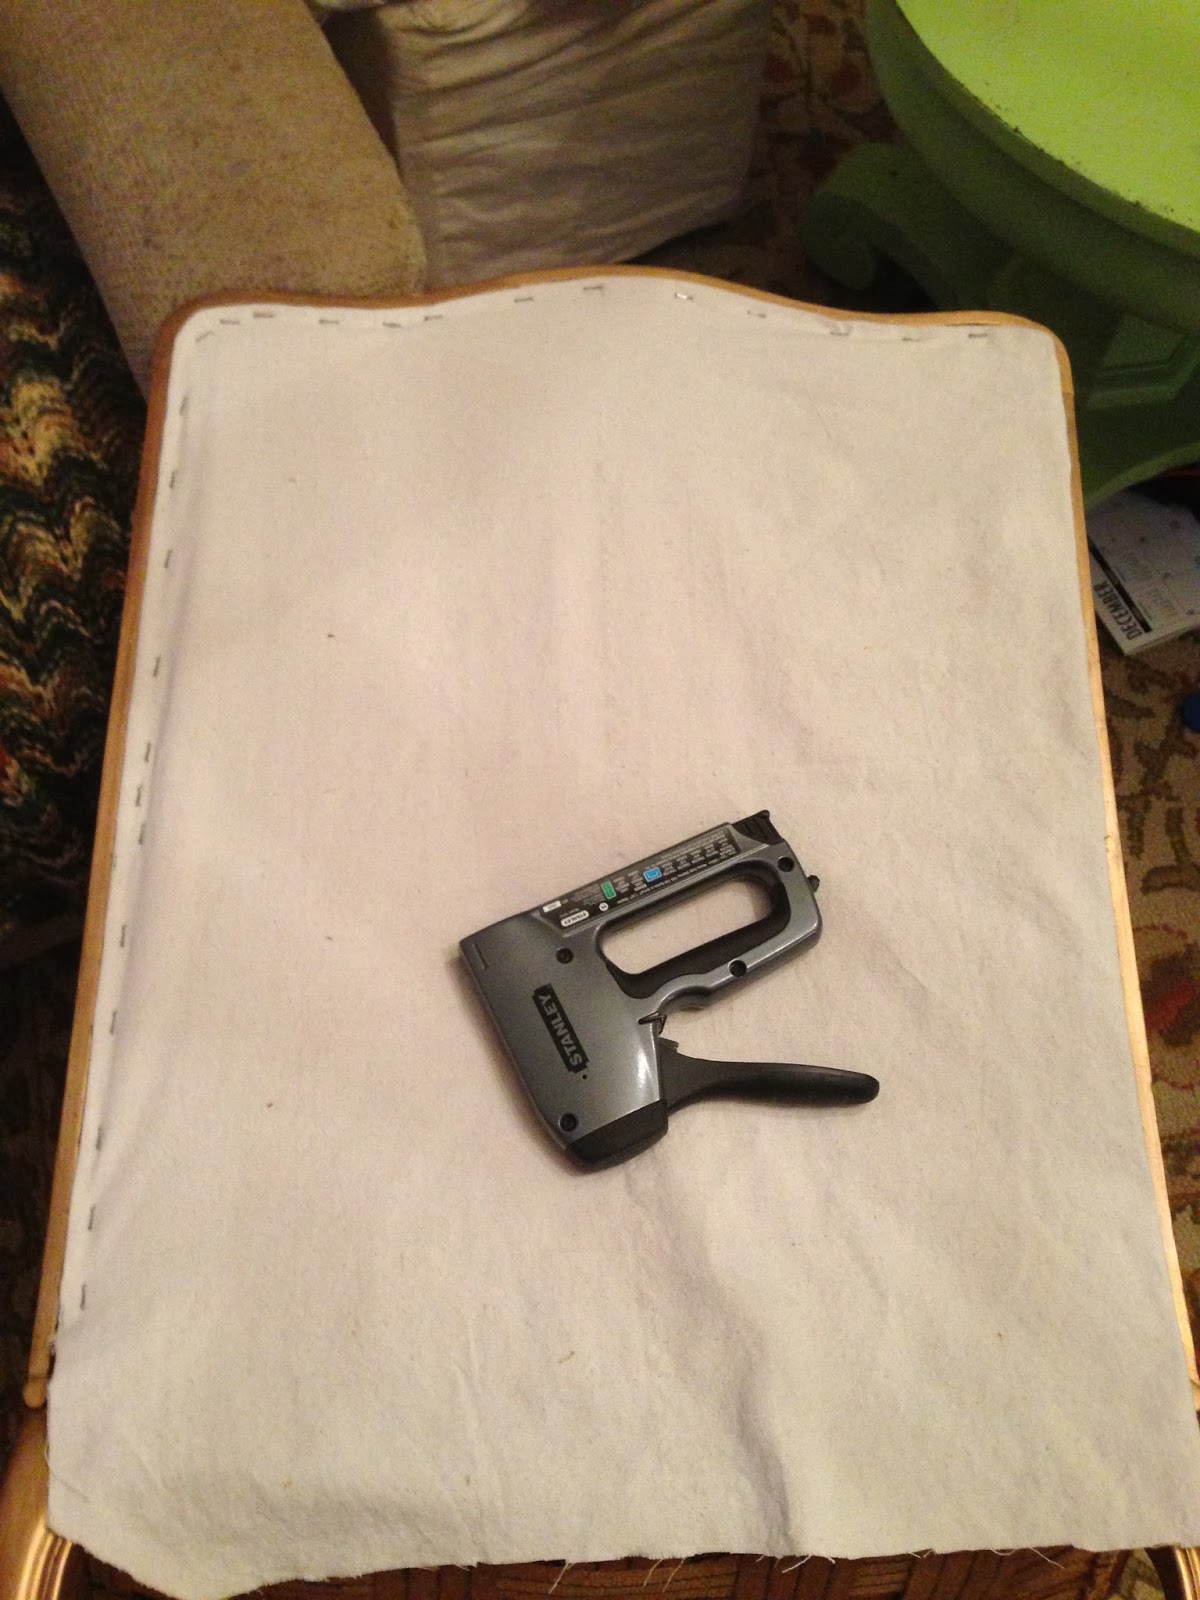
I started with the top of the footstool. I spread out my fabric and placed the top on it. I then just cut out a large square, giving me enough fabric to fold it on top and staple. Work on one side first with a staple and then pull the opposite side taut and again place a staple.

Fabric and trim for footstool 1.

Stapled underneath. I use a little bit of hot glue to keep the fabric down before stapling in place.


This is before I added the trim. You can leave it as is or add a decorative trim. I applied the trim using a hot glue gun.

Here's what the finished project looks like.


A few months ago, I bought 2 small footstools from Ikea. Super cheap at just $14.99 apiece. I picked out the off white canvas slipcover figuring I could just bleach away when needed. My initial plan for them was to flank them on each side of my bookcase, but when I got them set up, they came up, well kinda short, plus the off-white slipcovers didn't look right next to my very bright white bookcase. See my dilemma? I knew I would find a home for them eventually and recovering them would be a snap.
Here are a few pictures I found off Pinterest that really inspired me.
I headed to Jo-ann's and hit it big with 50% off all their fabric. I knew ahead of time that my 2 footstools would not be paired together, so I chose 2 separate fabrics. Both were on sale for $5.99 a yard and I bought 2 yards of each fabric. For $24 bucks, plus just a few extra dollars for a little bit of trim, I managed to customize these footstools to my own liking.
What I used to cover the footstools was my staple gun and my hot glue gun. You will also need a pair of fabric scissors to trim to size. If you didn't want to permanently attach your fabric you could easily substitute the glue for velcro strips. I used 2 yards for each with some fabric left over, (for future sofa pillows), and 2 yards of trim for each, with very little left over. You can omit the trim, but I chose to include it, as I just liked the look.
I started with the top of the footstool. I spread out my fabric and placed the top on it. I then just cut out a large square, giving me enough fabric to fold it on top and staple. Work on one side first with a staple and then pull the opposite side taut and again place a staple.
Here it is without the slipcover.
Fabric and trim for footstool 1.
Here's what the top looks like finished.
This is an interior wall inside the footstool. I hot glued the top and stapled. You can see at the bottom, the material was a little longer. I simply folded it over and gave it a bit of hot glue to make a seam.
This is before I added the trim. You can leave it as is or add a decorative trim. I applied the trim using a hot glue gun.
My next thing to do, is to just press it to get the wrinkles out and then spray some scotch guard to protect it.
Here is the second one I made using the same exact steps as the first. You will be seeing this same fabric again in a future post.